ChatGPT
Connect OpenAI's ChatGPT to your church's B1 data and let it do the heavy lifting. Once connected, ChatGPT can see your live church records and help you get things done that would otherwise take several steps in B1 Admin — or that you couldn't figure out how to do at all.
Some things you can ask it to do:
- "Set up Sunday School classrooms and put each teacher in the right room based on their group"
- "Show me everyone who attended last week but hasn't been assigned to a small group"
- "Summarize this month's giving by fund"
- "Who are our newest members and have we followed up with them?"
- "I can't figure out how to do X in B1 — can you walk me through it or do it for me?"
ChatGPT pulls the answers and takes the actions directly from your B1 data, scoped to your church only.
For the smoothest MCP experience, Claude Code is the recommended client — setup takes one command and it works out of the box. ChatGPT also works and is a great choice if your team is already using it.
Two paths are supported: the MCP Connector (built into ChatGPT) and a Custom GPT for teams that want a shareable assistant.
Before You Begin
- A church admin with the Edit Settings permission in B1 Admin (needed to create an API key)
- A ChatGPT Plus, Pro, Team, or Enterprise account
Quick Setup Guide
Follow these steps in the ChatGPT desktop app (Mac/Windows). The screens may look slightly different in other versions.
Step 1 — Get your API key from B1 Admin first
Before touching ChatGPT, create an API key in B1 Admin so you have it ready to paste:
- Go to Settings → Developer → API Keys in B1 Admin
- Click New API Key, name it
ChatGPT, choose your scopes (start withpeople:read,groups:read,attendance:read,donations:read), and click Save - Copy the
cak_…key — it's only shown once
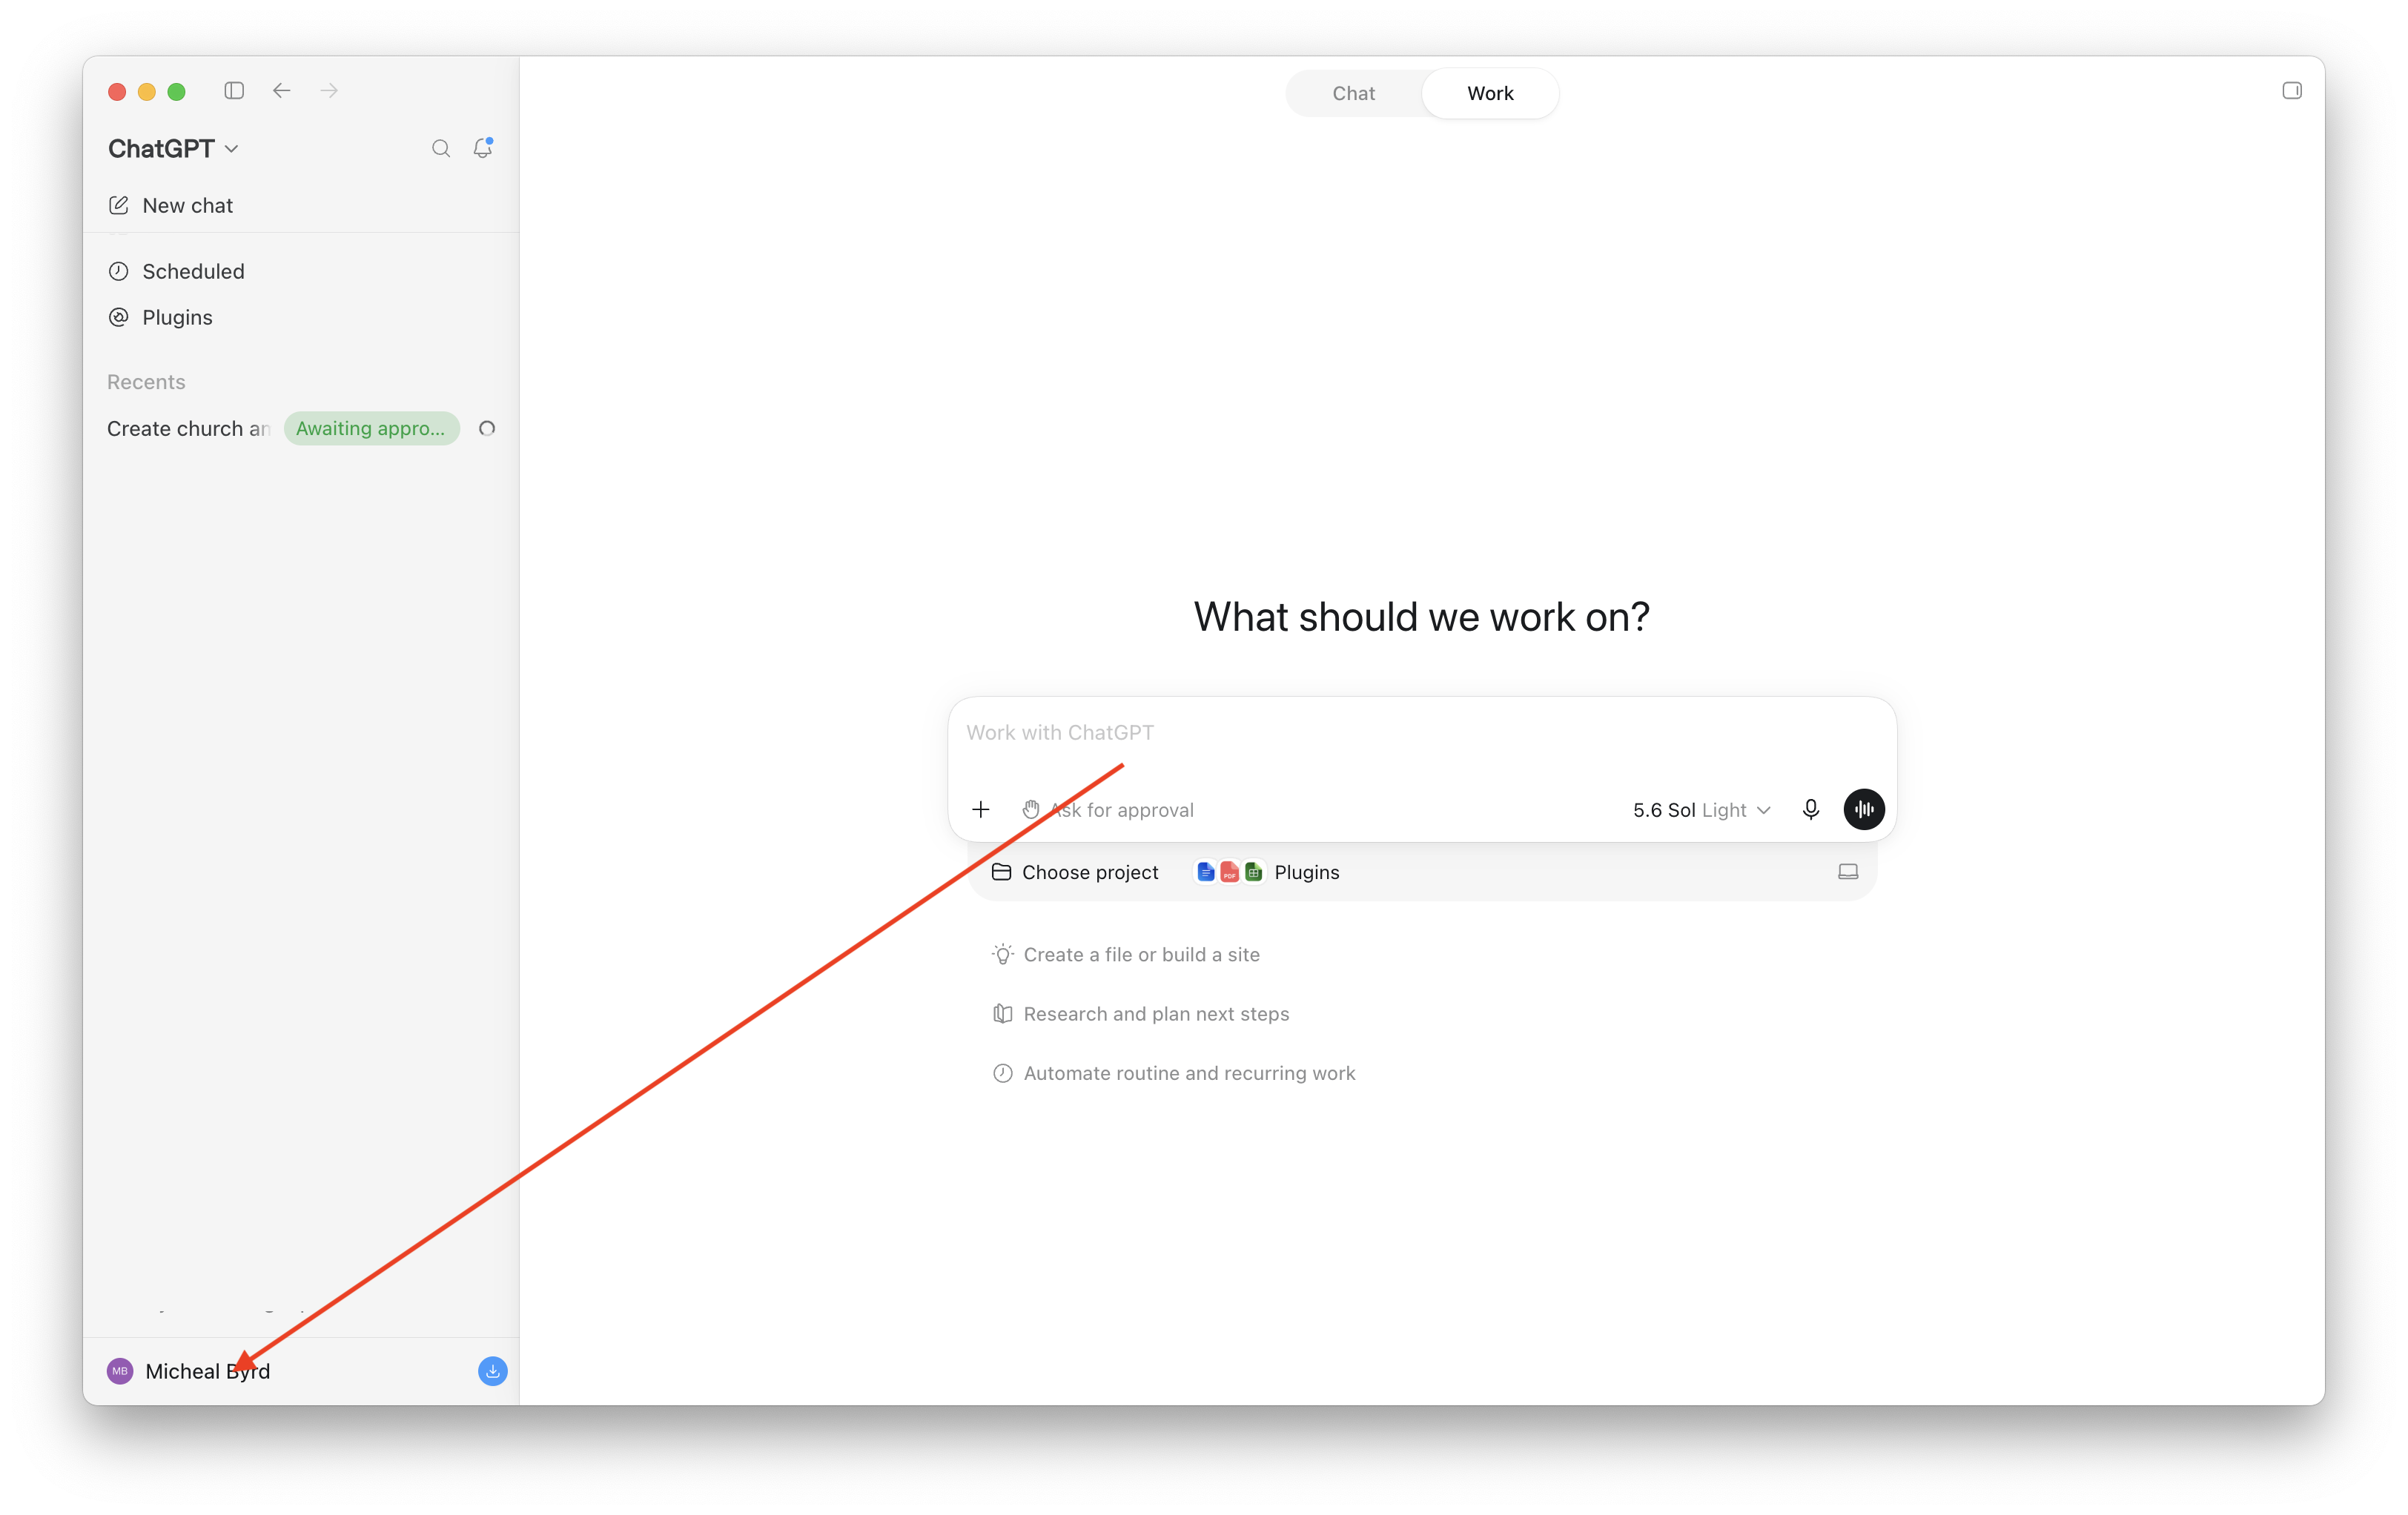
Step 2 — Click your name in the bottom-left corner of ChatGPT
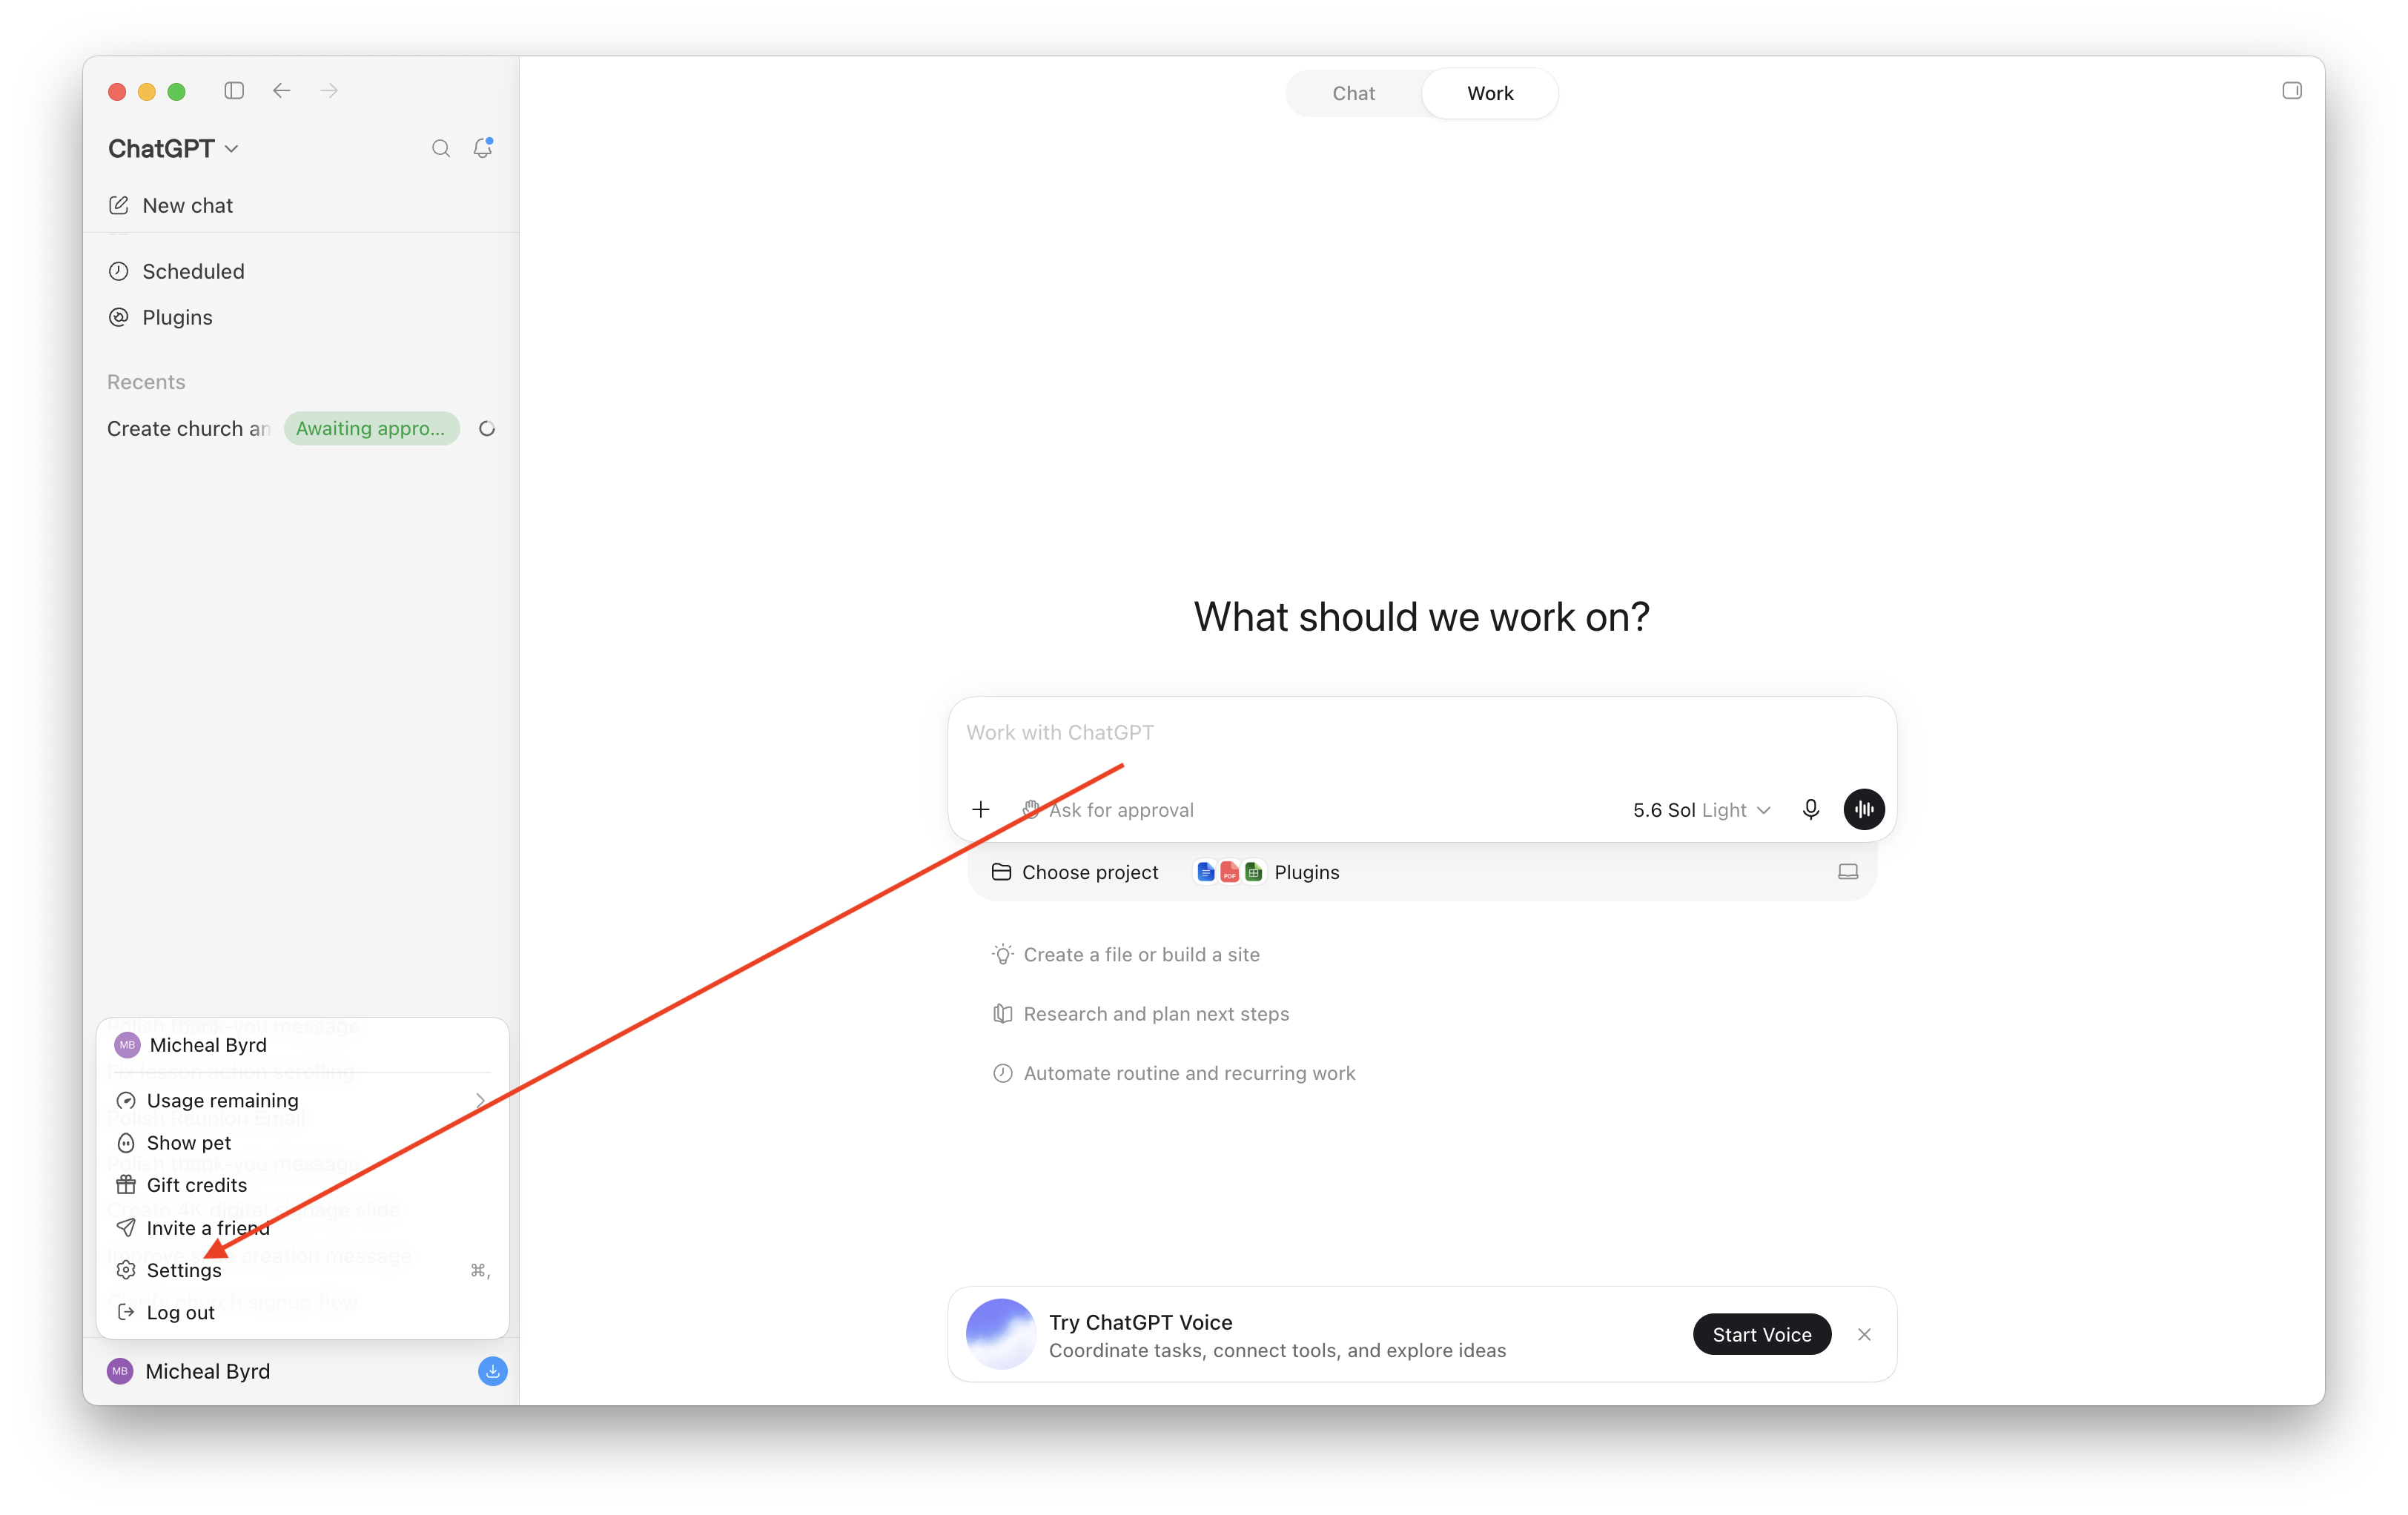
Step 3 — Click Settings
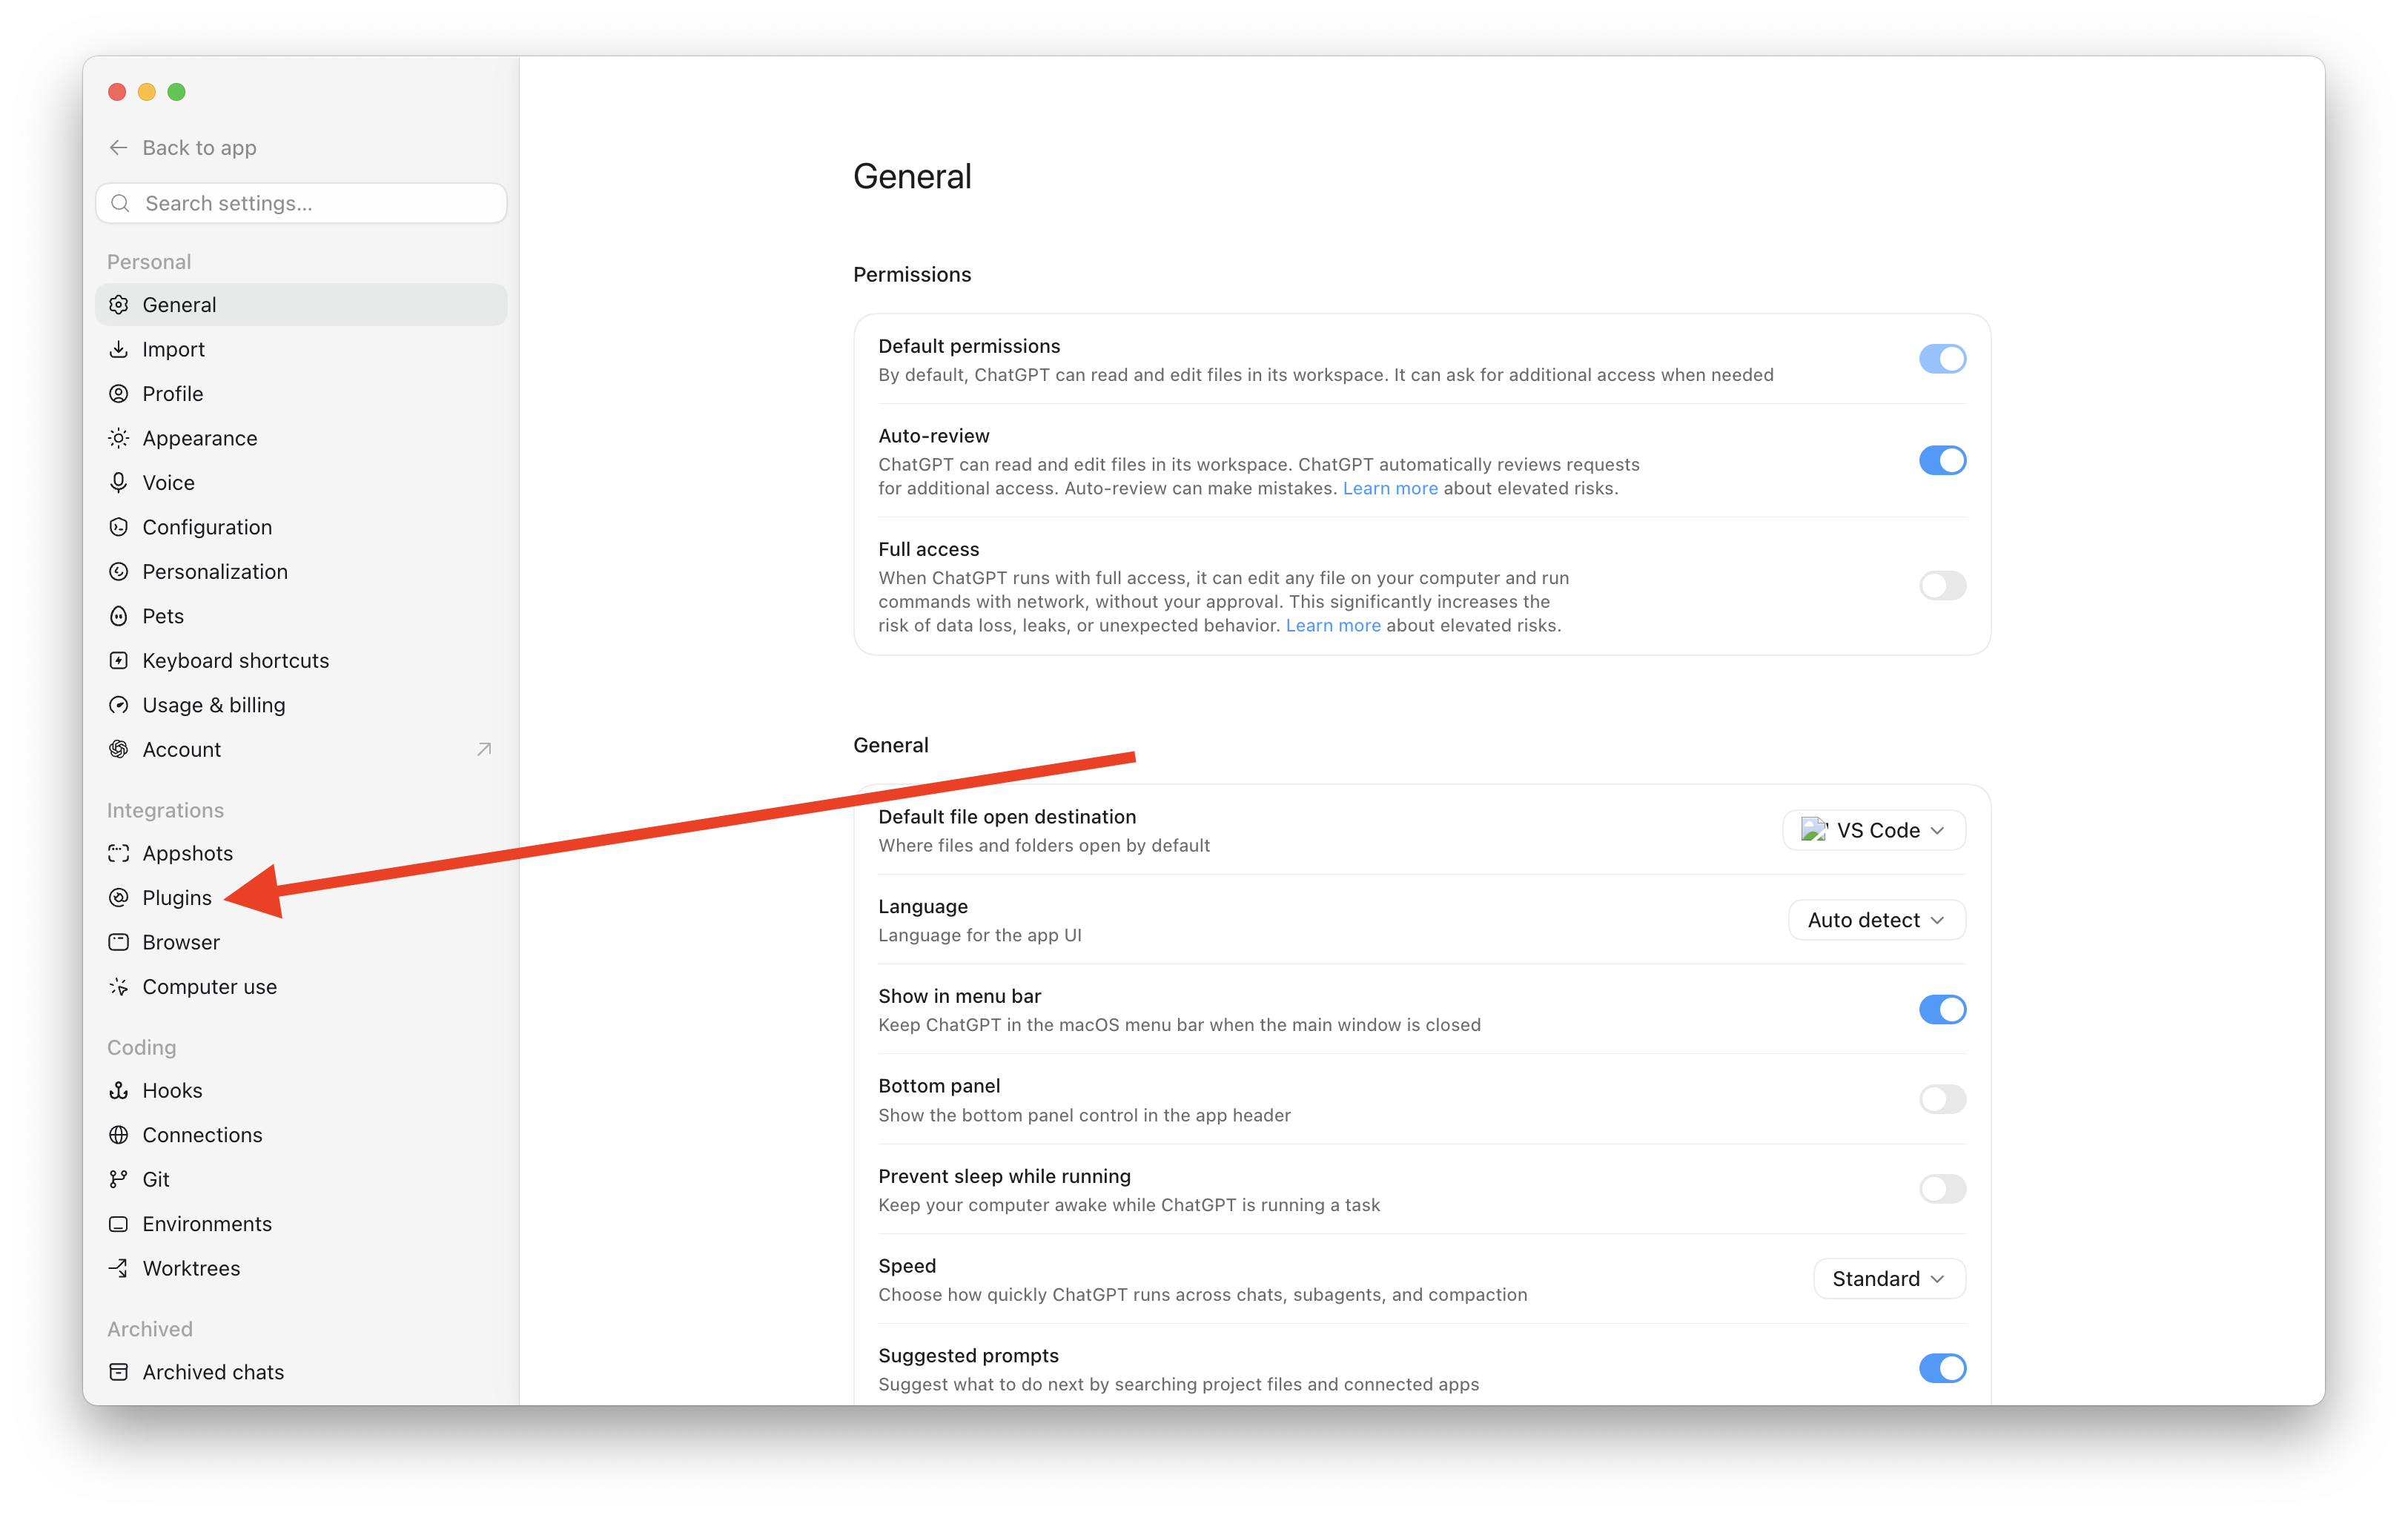
Step 4 — Click Plugins in the left sidebar
Step 5 — Click the MCPs tab
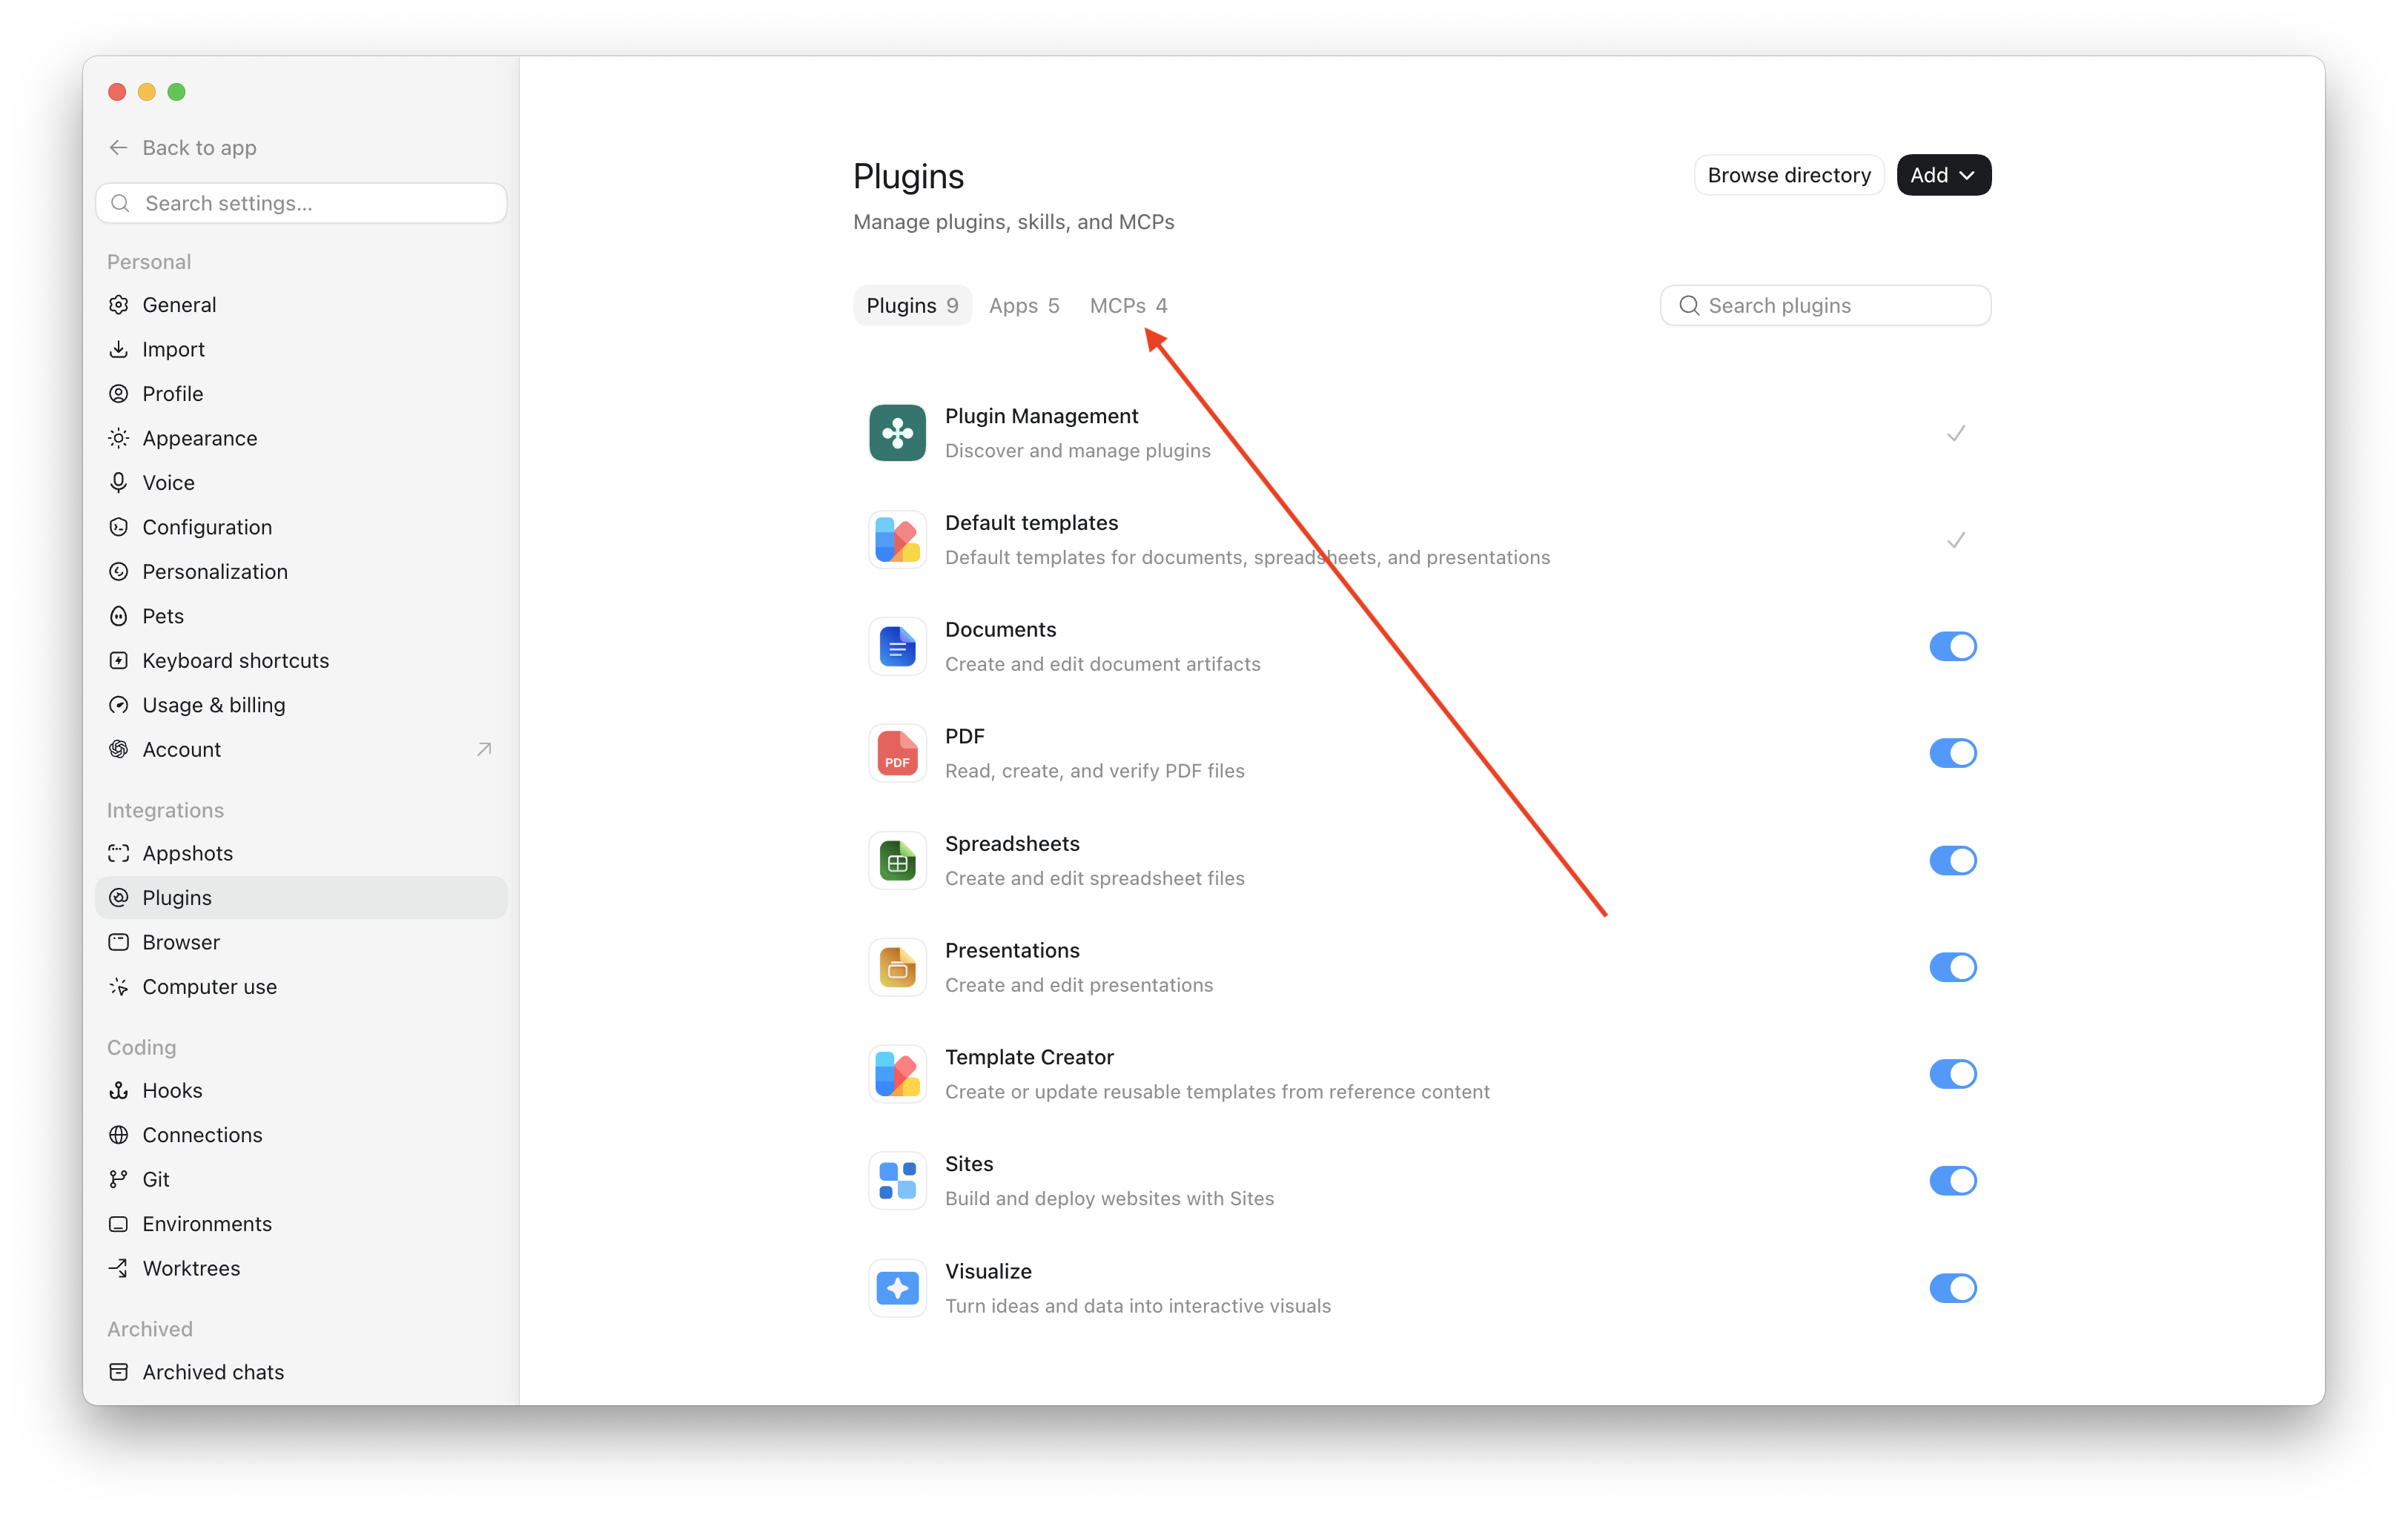
You'll see any MCP servers you've already added here.
Step 6 — Click Add → Add MCP server
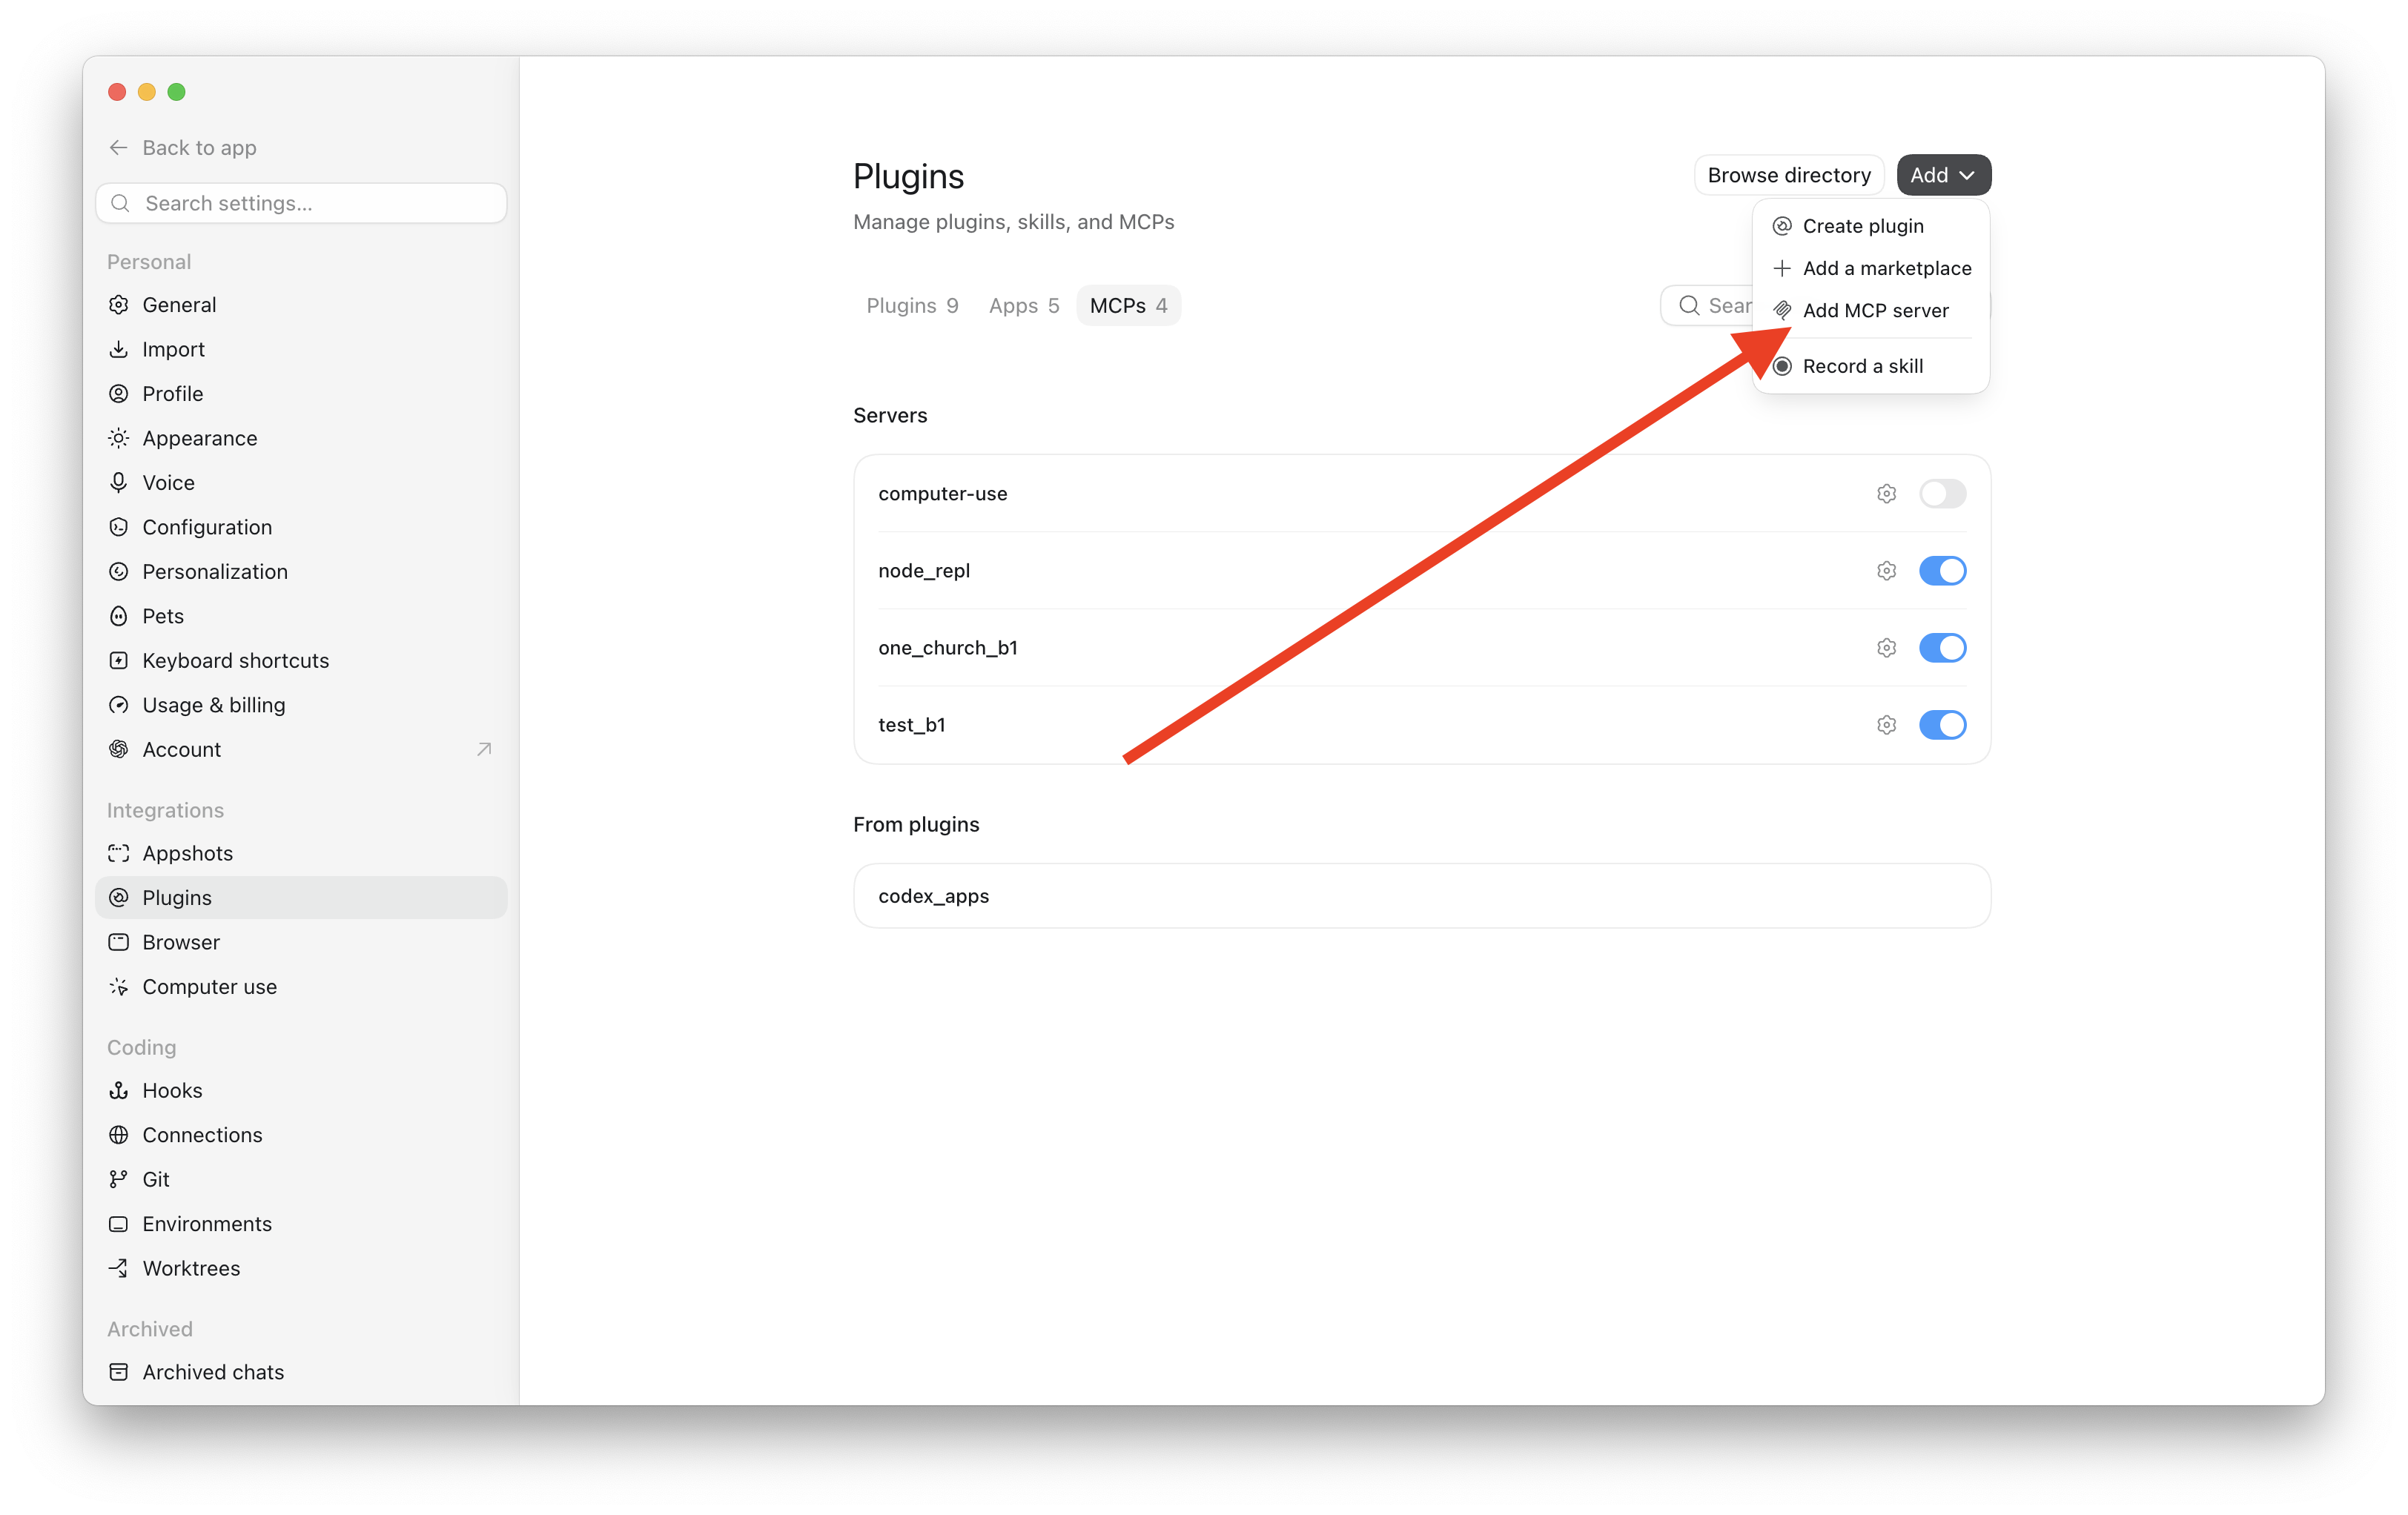
Step 7 — Fill in the form and click Save
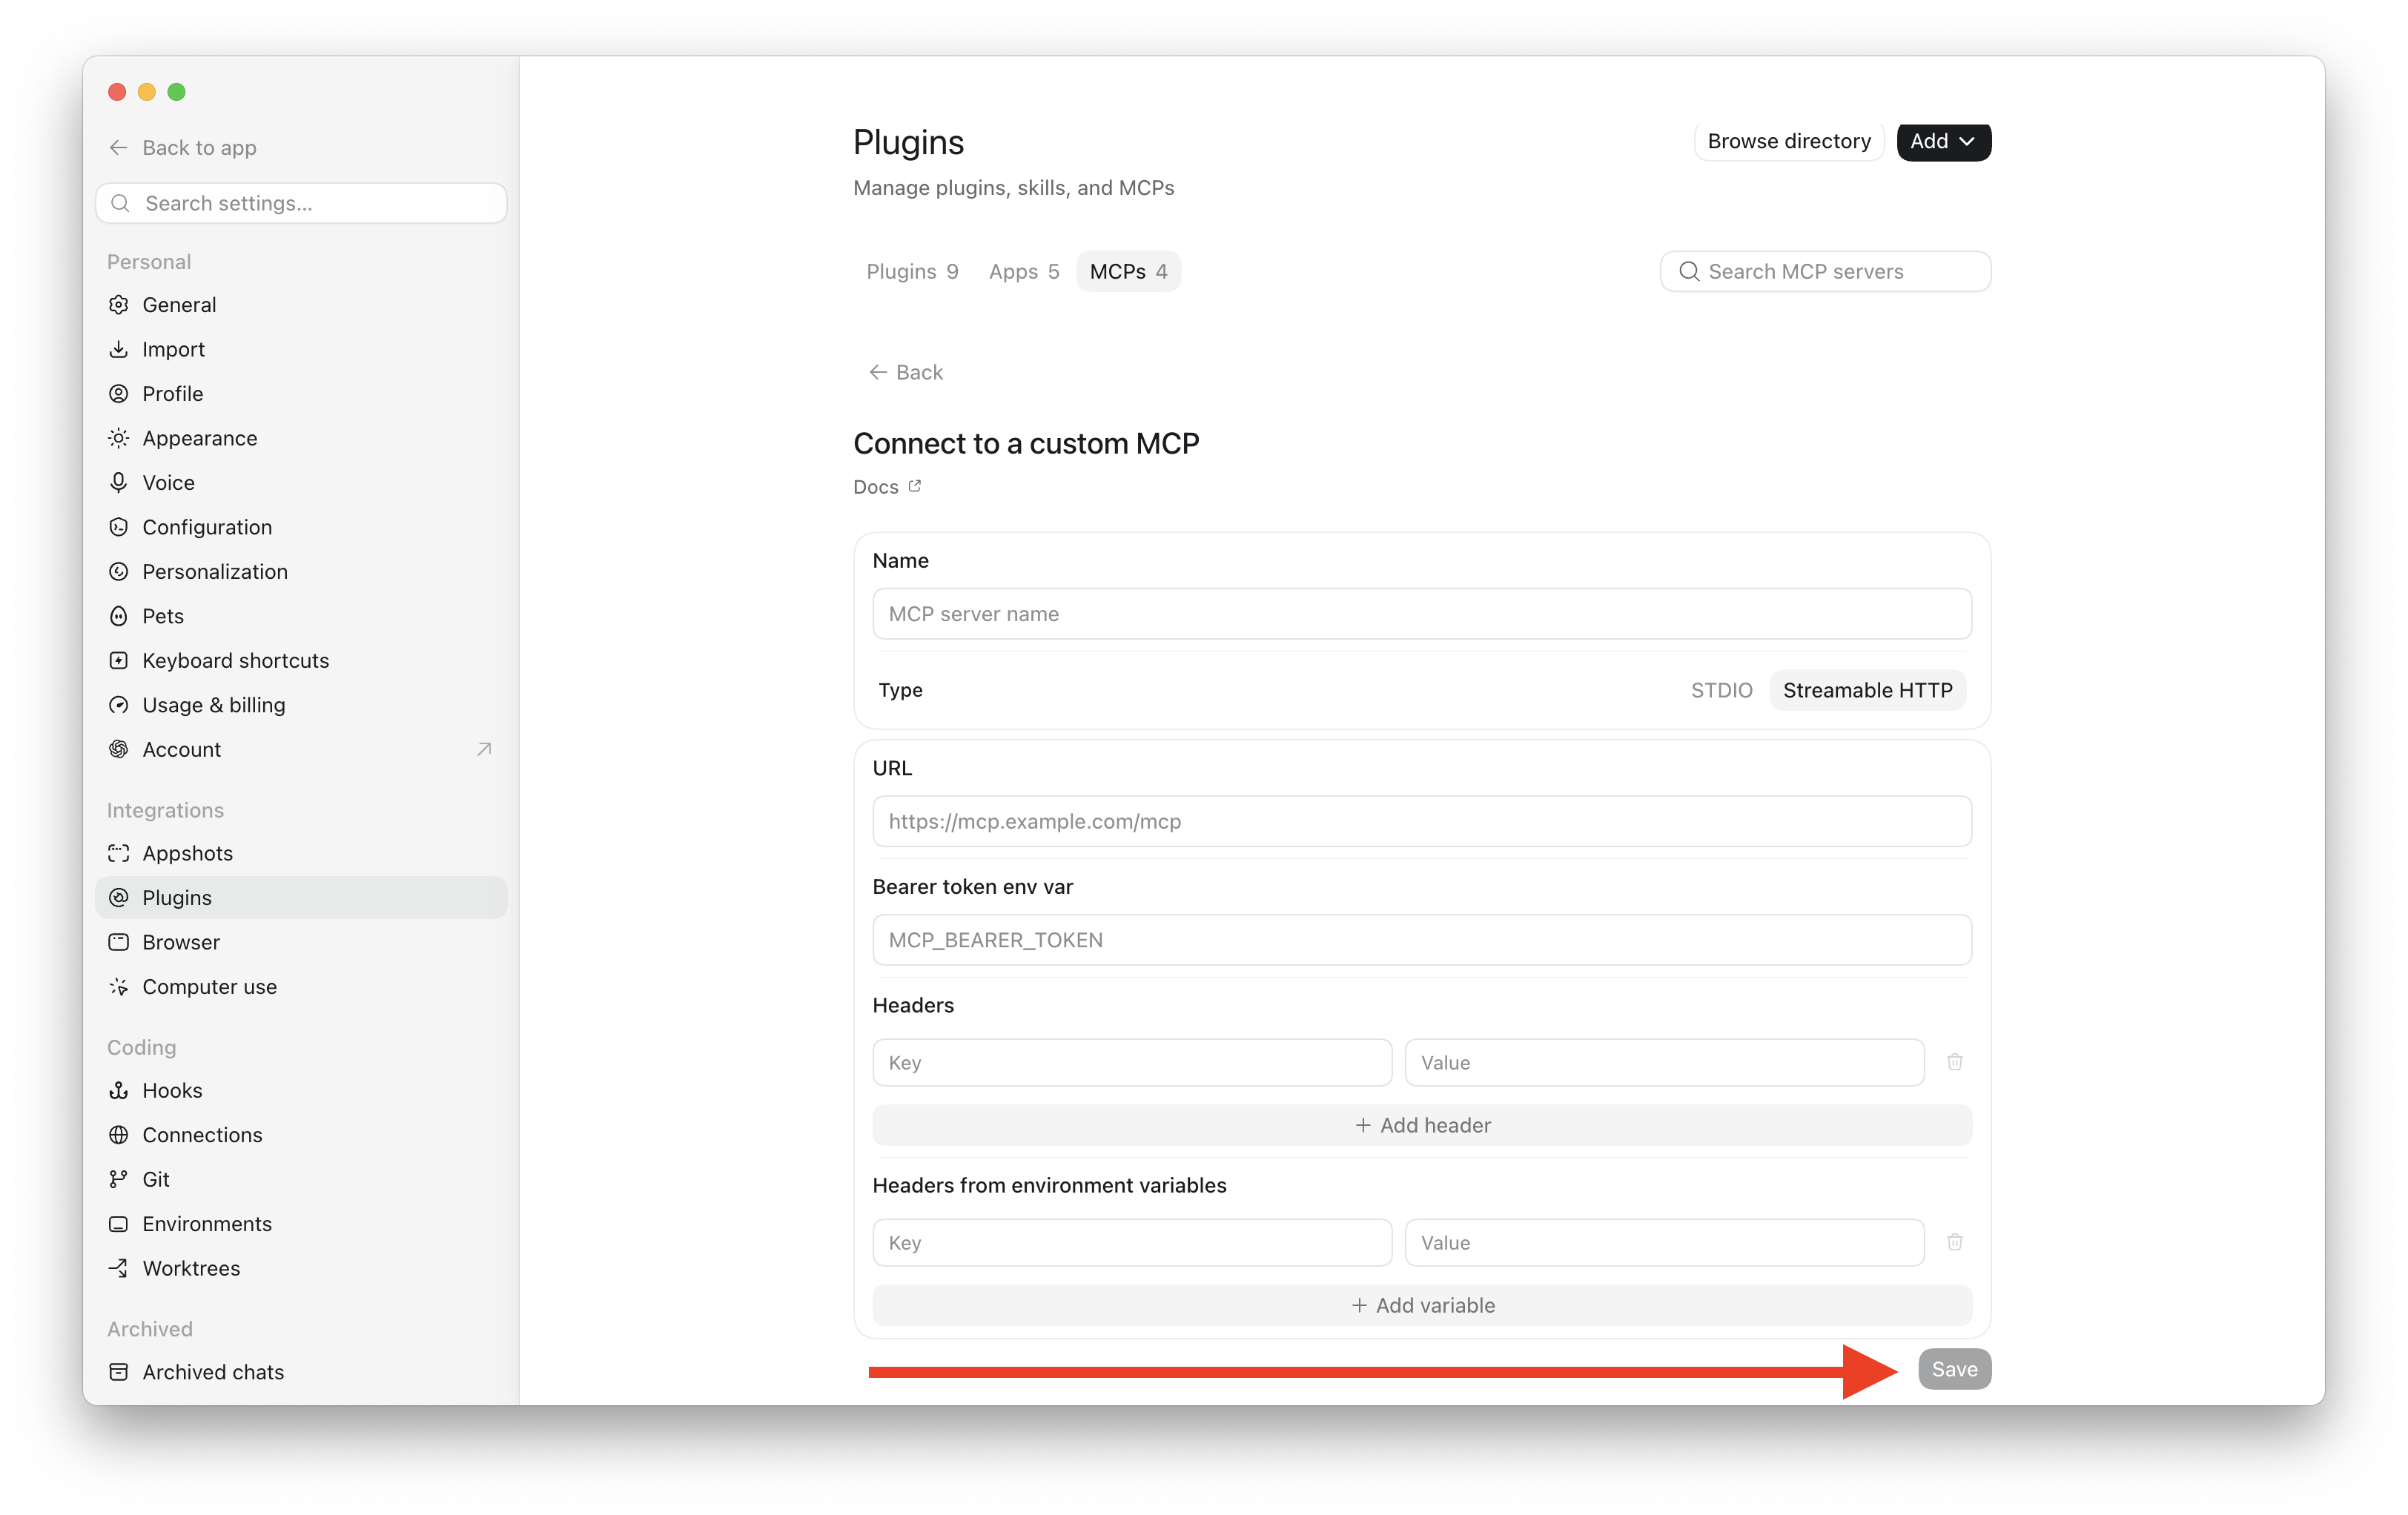
Click Streamable HTTP, then fill in:
| Field | What to enter |
|---|---|
| Name | B1 Church (or any name you like) |
| Type | Click Streamable HTTP |
| URL | https://api.churchapps.org/mcp |
| Bearer token env var | Leave blank |
| Headers | Click + Add header → Key: Authorization → Value: see below |
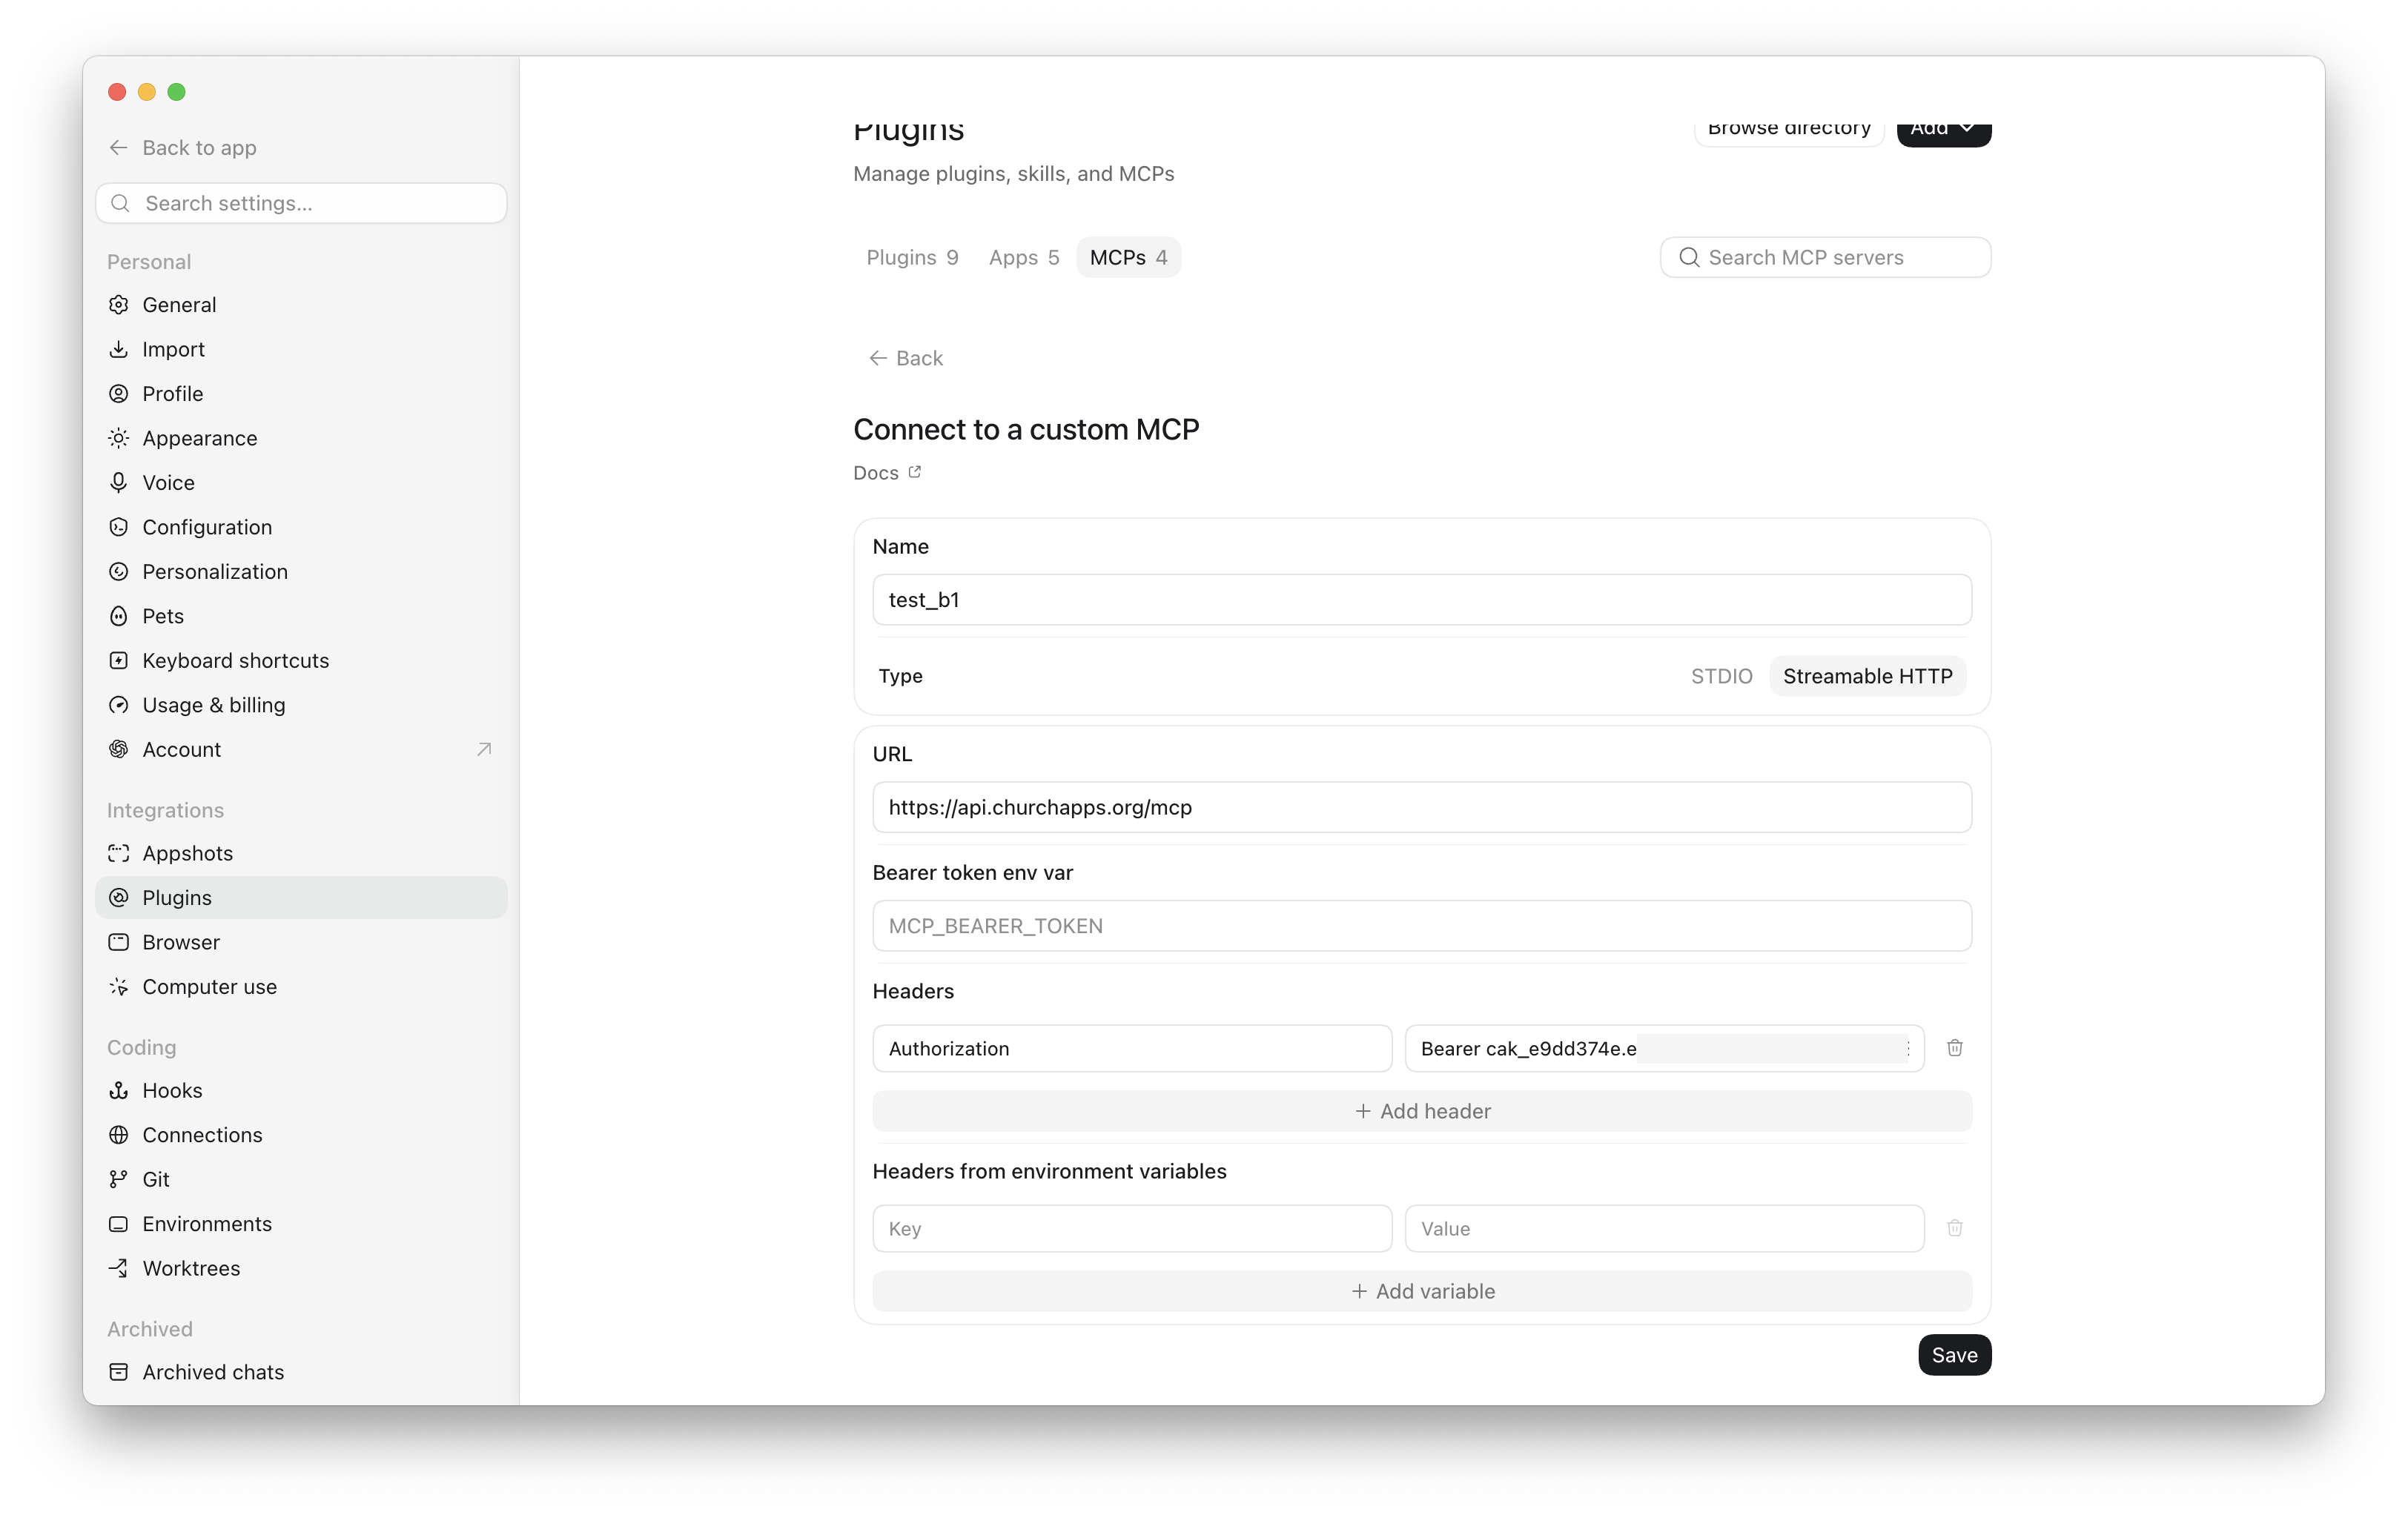
- Key:
Authorization - Value:
Bearer cak_yourkey— the word Bearer, a space, then your key
Click Save.
That's it! Go back to a chat and ask something like "How many people are in our church?" and ChatGPT will pull the answer straight from B1.
Step 1 — Create an API Key in B1 Admin
Every connection to B1 uses an API key that you create. This key identifies your church, controls what ChatGPT can see, and can be revoked any time.
- Open B1 Admin and go to Settings → Developer → API Keys.
- Click New API Key.
- Give the key a name —
ChatGPTworks well. - Select the scopes (permissions) ChatGPT should have. A good starting set for a read-only assistant:
people:readgroups:readattendance:readdonations:read
- Click Save.
- Copy the full key that appears — it starts with
cak_and is shown one time only. Paste it somewhere safe.
If you ever need to revoke ChatGPT's access, go back to Settings → Developer → API Keys and delete the key. Access ends immediately.
Path A — ChatGPT MCP Connector (Recommended)
This is the simplest way to connect. ChatGPT has a built-in "Connect to a custom MCP" dialog that works directly with B1's MCP server — no Custom GPT required.
What you need
- Your
cak_…key from Step 1
Open the MCP connector in ChatGPT
In ChatGPT, go to Settings → Plugins → MCPs and click Add → Add MCP server.
Fill in the dialog
Click Streamable HTTP, then use these values:
| Field | Value |
|---|---|
| Name | B1 Church (or any name you like) |
| Type | Streamable HTTP |
| URL | https://api.churchapps.org/mcp |
| Bearer token env var | Leave blank |
| Headers | Key: Authorization / Value: Bearer cak_yourprefix.yoursecret |
For the Value field, type the word Bearer, one space, then paste your key — all in the same box. Example: Bearer cak_prefix.secret.
Click Save.
Ask ChatGPT something
Once connected, just ask in plain language — no special commands needed:
- "How many people are in our church?"
- "Who joined in the last 30 days?"
- "What groups are active right now?"
- "Summarize this month's giving by fund."
ChatGPT will call B1 behind the scenes and answer from your live data.
Path B — Custom GPT with Actions
A Custom GPT lets you create a dedicated assistant your whole team can share — they open a link and start asking questions without any setup on their end. It requires a ChatGPT Plus, Team, or Enterprise account and about 10 minutes.
1. Create an API key
Follow Step 1 above if you haven't already.
2. Build the Custom GPT
-
In ChatGPT, click your profile → My GPTs → Create a GPT.
-
Switch to the Configure tab, give the GPT a name (e.g. "B1 Assistant") and add instructions:
You help church staff query their B1 records. Use the B1 API actions to
look up people, groups, attendance, donations, and content. Always scope
answers to data the user has permission to see. Be concise. -
Scroll to Actions → Create new action → Authentication.
- Authentication type: API Key
- API Key: paste your
cak_…key - Auth Type: Bearer
- Save.
-
In the Schema box, paste this starter OpenAPI spec:
openapi: 3.1.0
info:
  title: B1 API
  version: "1.0"
servers:
  - url: https://api.churchapps.org
paths:
  /membership/people:
    get:
      operationId: listPeople
      summary: List people in the church
      parameters:
        - in: query
          name: firstName
          schema: { type: string }
        - in: query
          name: lastName
          schema: { type: string }
        - in: query
          name: email
          schema: { type: string }
      responses:
        "200":
          description: OK
  /membership/people/{id}:
    get:
      operationId: getPerson
      summary: Get a single person by id
      parameters:
        - in: path
          name: id
          required: true
          schema: { type: string }
      responses:
        "200":
          description: OK
  /membership/groups:
    get:
      operationId: listGroups
      summary: List groups in the church
      responses:
        "200":
          description: OK
  /giving/donations:
    get:
      operationId: listDonations
      summary: List donations
      parameters:
        - in: query
          name: personId
          schema: { type: string }
        - in: query
          name: startDate
          schema: { type: string, format: date }
        - in: query
          name: endDate
          schema: { type: string, format: date }
      responses:
        "200":
          description: OK
  /attendance/attendance:
    get:
      operationId: listAttendance
      summary: List attendance records
      parameters:
        - in: query
          name: serviceTimeId
          schema: { type: string }
        - in: query
          name: campusId
          schema: { type: string }
      responses:
        "200":
description: OK -
Save the action. Test it: "how many people are in the church?" — ChatGPT calls
listPeopleand answers. -
Publish the GPT (Only me / Anyone with link / Organization) and share the link with your team.
3. Use it
Anyone with the link can ask natural-language questions. The key's scopes still apply — a read-only key refuses writes regardless of what the action schema says.
Safety and Limits
- Per-church isolation. The API key resolves to one church only. ChatGPT cannot see other churches' data.
- Permission-scoped. The key only carries the scopes you granted. Removing a scope (by deleting and recreating the key) cuts that access on the next call.
- Revocable instantly. Delete the key in Settings → Developer → API Keys and access ends immediately.
- Sharing a Custom GPT shares the data. Everyone with access to the GPT can see whatever the key's scopes allow. Prefer narrower scopes (e.g. omit
donations:read) for GPTs shared broadly. - Audit trail. Any changes made through ChatGPT go through the same audit log as B1 Admin actions — find them under Reports → Audit Log.
Cost
ChurchApps is free and open-source — the API ChatGPT calls is part of what your church already runs. OpenAI charges for ChatGPT usage per their own plans. There is no per-call cost from ChurchApps.
Troubleshooting
The MCP connector says "Unauthorized" or shows a 401 error: your API key is missing or incorrect. Open the connector settings and check that the key in the Authorization:Bearer argument is the full cak_… value with no extra spaces.
ChatGPT says it can't find certain data: the key may not have the right scopes. Create a new key in Settings → Developer → API Keys with the additional scopes and update the connector.
The npx command fails: Node.js may not be installed. Download and install it from nodejs.org, then try saving the connector again.
Custom GPT action returns 401: in the action's authentication panel confirm Auth Type: Bearer is selected and the key does not include the word Bearer (ChatGPT adds it automatically).
Custom GPT action returns 403: the key doesn't have the scope for that endpoint. Create a new key with the correct scopes and update the GPT.
The action schema is rejected: ChatGPT requires OpenAPI 3.1 with at least one paths entry and a servers URL. Validate the YAML at editor.swagger.io before pasting.
Related
- API Keys — full scope reference
- MCP Server (developer reference) — protocol details and tool schemas
- Claude — same idea, for Anthropic's models
- REST API reference — every endpoint a Custom GPT action can call